If you would like to add additional web pages to your public site, you can do so by going to Portal Content > Pages.
Organizations often use Pages to add a Contact Us, About Us, Staff, Matching Gifts or Privacy Policy page.

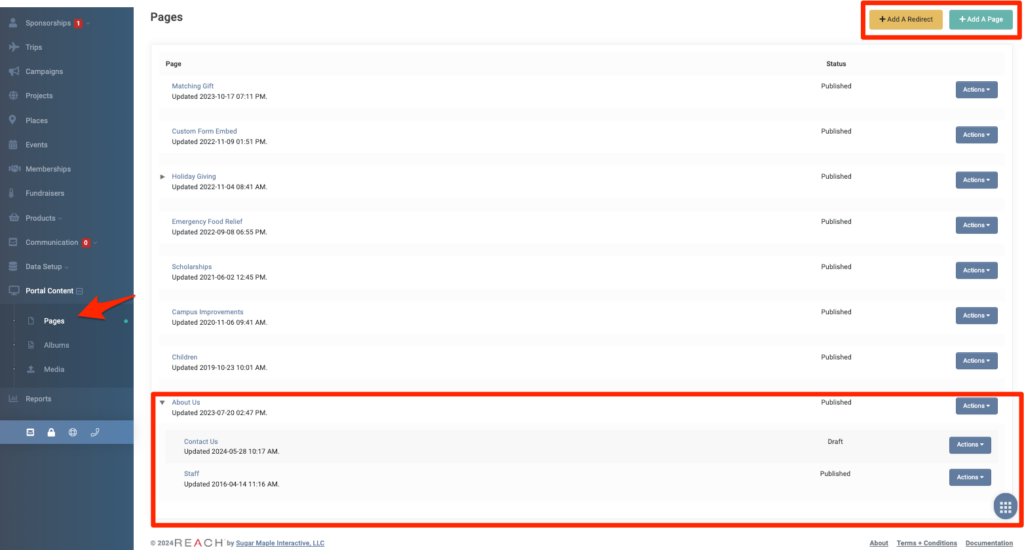
Shown above is the main index page for Pages which includes:
- Two buttons, an + Add A Redirect and an + Add a Page
- A list of all Pages you’ve created
- A Status of each Page. The Status will be Draft or Published. A Page must be Published to show publicly.
- An Actions button next to each Page where you can:
- Edit
- + Add Child (a sub page)
- View
- Delete
- If a Child Page is added, you’ll see an arrow which you can click to show the Child Pages.
- Example: About Us is the Parent Page and Contact Us and Staff are the Child Pages.
Add a Redirect
A Redirect is a way to divert supporters from one page on your site to a different page.
To add a Redirect:
- Click the + Add a Redirect button in the top right of the main Pages index
- Add a Title – this is the Title of your new Page
- Add a Parent page – this is used if the Redirect page will be a child page on your site
- Select the Status – Draft of Published. A Page must be Published to show publicly.
- Redirect To URL– If you are using your own domain name with your REACH account, you can use the Redirect To field to build permanent redirects for URLs you may have used on a previous site: example.org/donate-now; Redirect To www.example.org/donations?new.
- Click Create Page

Now, when a supporter goes to the Page, they will be redirected to the Redirect URL’s page.
Adding a Page
REACH includes a Page editor to help you build your Page.
First, go to Portal Content > Pages > + Add a Page
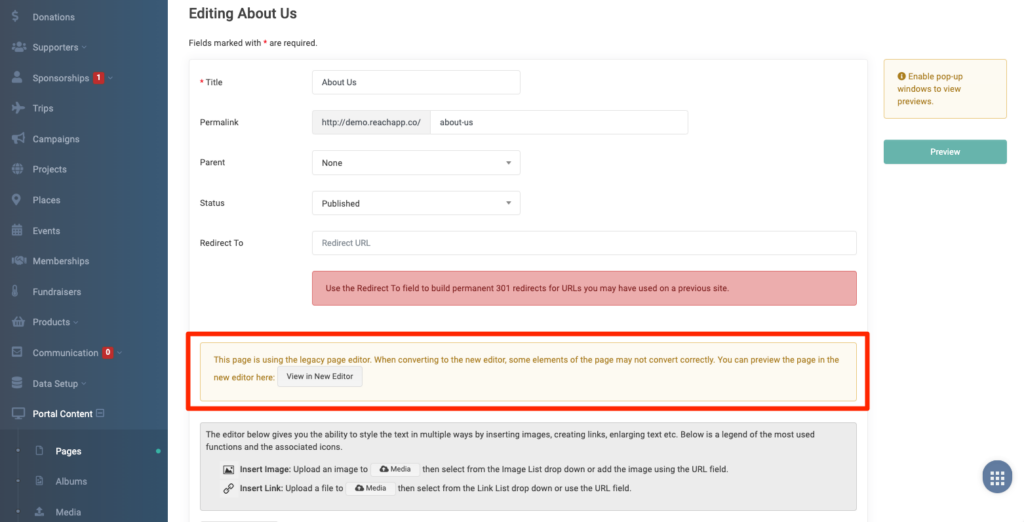
Note: This yellow box indicates your Page was initially created using the former, legacy page editor. You can continue to use the legacy page editor or click on View in New Editor to view the Page and make updates using our newest Page editor (added May 2024).

Here is the new Page editor and how to add a Page:

- Title is required – this is the Title of your Page. It will be displayed in the webpage header when using the default REACH Theme, and will be used when selecting this Page to add to your menu.
- Permalink – this is based on your Page’s Title and will be the URL of your page. It cannot be edited.
- Parent – You can link a page to a Parent Page, creating a hierarchy/grouping of pages. Once at least one page has been created, you will have the option to select it as a Parent Page. For example, you could create a page titled “About Us” and then create a “Staff” page, selecting About Us as the Parent page. The permalink created for a page will reflect a parent permalink – for example, http://demo.reachapp.co/about-us/staff.
- Status – When editing the page, keep it as a Draft. When ready to publish the page, choose Published from the Status drop down. It is only publicly viewable when Published.
- Featured Image – Choose file to upload or Select Image from Media Library to add a cover image on your page. We recommend a jpeg or png image with the width of at least 2000px and a height around 500px.
Now, let’s review the options provided in the editing bar:

- Default Font – From the dropdown menu, choose from our list of approved web-based fonts to be used as your default font throughout your Page.
- Text Color – Use the color selector to choose a text color or type in the hex color #. For example, black is #000000.
- Paragraph Style – Use the styling tools to choose your paragraph style font – normal, Heading 1, Heading 2, Heading 3.
- Font Style – Choose from Bold, Italic, Strikethrough
- Paragraph Alignment – Text Align Left, Center, Right or Justify (full width).
- Block Options – Insert a Block Quote, Bullet List, Numbered List or Section Separator, which is a thin, dotted line used to separate areas in a row/column
- Insert Options –
- Insert/Edit Link – select your text that you want to be linked, then click this button, add your URL and click Insert
- Insert/Edit Button – click on the area you want to add a button, then click this button. Text will be the text shown on your button; choose Target – _blank opens a new window, _self stays in same window; Link – add the URL for the button; Click Ok.
- Note: All button colors are based on what you have included under Settings > Portal Design > Background and Button Color and Text Color. These cannot currently be edited. The correct colors will display when published.
- Insert/Edit Table – to include a table, click this button and drag to highlight the number of rows and columns you want to insert. Click on the table once highlighted to add it to your column.
- Insert/Edit Image – click on the area you want to add an image, then click this button. Click Browse to choose a file from your computer, then click Upload to add it. Or, Search for a file, that you have already uploaded, then click on it to add it. Once added, you can click on the Edit icon to adjust its Width, Height, Title, Alt and view its Source or click Delete to remove it. Width and Height should use a valid CSS unit, for example 100px. You can also click on the image and then use the Text Align options to adjust your image position.
- Insert/Edit HTML Block – click on the area you want to add an html block, then click this button. Add your html here.
- Note: This is commonly used in REACH when you want to embed a donation form. Refer to our Donation Forms and Links article to learn more. The html embed code for your custom donation forms can be found by clicking Actions > Share and copying the Embed Code.
- Use the Undo/Redo buttons to correct any mistakes.
- Use the Preview button to preview the page. This will preview the page regardless if it’s in Draft or Published status.
- Click Save Changes to save your updates to the Page.
Now, onto how to add your Content.
First, you will need to click + Add Row to add a row of content.
Once added, click + Add Column to add your columns of content. Choose from Full Width for the column to span the width of your Page, or 1/4; 1/3; 1/2; 2/3 or 3/4ths to span accordingly.
Example: You can click 1/3 width, then + Add Column, click 2/3 width for this, where an image is added in the 1/3 width column and text is added in the 2/3 width column, as shown below:

You can use the Copy button to copy the column or Delete to remove it. You can also use the blue Edit button to edit any inserted items, for example the image in the 1/3 width column.
Example: To create the following, you will add a row with a Full Width column, then add Header 1 Text. Create another row with a 1/3 width column, use the Insert/Edit Button to add the button, click Copy, then edit the button to input the next column’s button content and repeat.

- Click Create Page when complete
To add your new page to your REACH menu:
- Go to Settings > Menus and select Pages from the target dropdown list, then select your page title. Note: The created Page must be Published first.
- Read more about setting up your menu in our Menus article. Note: REACH is not set up to automatically support secondary sub-menus.
To link to the page from another website, use the provided URL with Permalink at the top the Page editor.
Additional Notes
- Remember, you can preview the page prior to publishing by clicking on the Preview button. Note that pop-ups must be enabled to view the preview.
- Once created, you can Edit your Page to change the permalink of the page. The permalink will default to the title given, but can be edited as needed. Note: Changing a permalink can break links if you have already shared the page.
- To add your new page to the footer area, which is a common request for a Privacy Policy page, you will need to edit your REACH Theme and add it to the Layout Template.


Let’s Get Social