If you would like to email all of your supporters, or perhaps groups of supporters connected to certain Projects, Campaigns, Sponsorships, etc., you can do that using the Emails Module.
The main Emails page will list all emails sent out from your organizations REACH account, the Belongs to(Recipient – listed as a group or defined Purpose based on the Send To field when composing), Send date, if Sent. The list is default ordered by date, but can be re-ordered by clicking the column headers.
Notes:
All system notifications will come from notifications@reachapp.co, and list the Account Name as the sender.
Email Tracking is available for organizations on the REACH Pro and Pro Plus plan levels. You can upgrade your plan level at anytime by going to Settings > Account Settings.
Note: The Emails module uses the Emailings Template by default. You can customize this template by going to Settings > Email Templates. Keep in mind that any changes made to the Emailings Template will reflect on all emails sent from the Emails module.
Setup for Testing Emails
Emails you send from REACH will come from notifications@reachapp.co, with the name and reply-to email of the Admin that is preparing the email.
We suggest you create an Admin User account that has a general name (ex: org name) and email address (ex: info@) to use for emailings. Just be sure you are logged in to that Admin User account when preparing and sending the email so the email comes from that general email address.
You can test your email by typing your own email address in the Recipients box and not selecting a Purpose group. You can also create a Test Group as a Supporter Group that includes yourself and additional admins within your organization to be used as a test. Once created, you can test your emails by sending to yourself or the test group to ensure everything looks as intended.
Send an Email to a Group of Supporters
- Go to Communications > Emails.
- Click the green + New Mailing button.
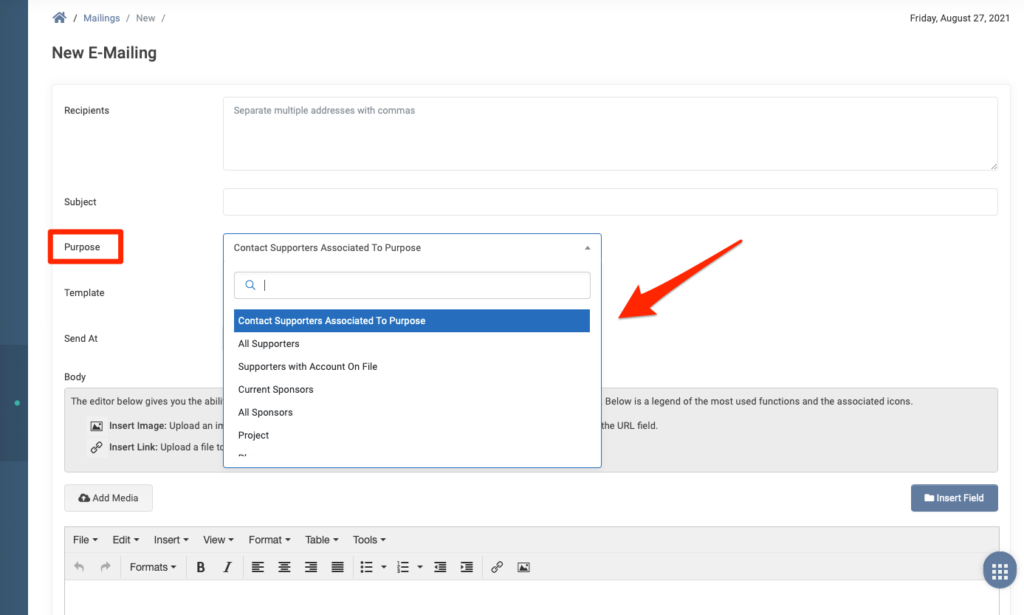
- Next to Purpose, select the group of recipients you would like the email to go to. The purpose you select from the dropdown list will determine who receives the email – any supporter with a donation attached to that purpose.
- Note: By selecting All Supporters, the email will be sent to any Primary email address on file for your supporters who do not have their Contact Options set to No.
- If there are additional recipients that need to receive the email and are not within the grouping you selected, type those in the Recipients box.
- Note: Recipients will NOT see the list of other email recipients. Only their email address will be listed in the “To” field.
- If you would like to use a custom template you have already created, or if you would like to create a template from the the email you are creating, select that from the Template dropdown.
- Use the Send At fields to schedule the email to be sent at a future date and/or time.
- Create your message, using any images or fields as needed.
- Important Note: It is never recommended that videos be sent via email. Email platforms generally do not support videos due to size; therefore, any emails that include videos do not surpass the size limit and therefore never make it to the recipient’s inbox. Instead, we always recommend using a service such as YouTube or Vimeo and linking to the video via its URL in your emails. You can also use a thumbnail or image of the video and link that image to the video.
- Click the Add Media button to upload any files to include.
- Once added, click the photo icon or Insert dropdown to select the image or file and add it to your email.

Send an Email to an Individual Supporter
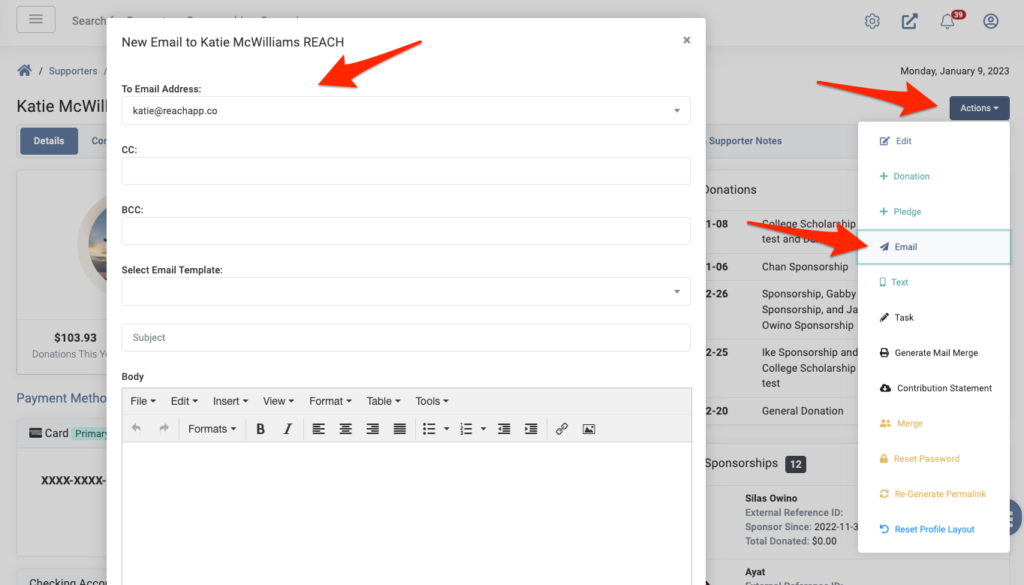
You can send an email directly to an individual supporter from their Supporter profile page by going to Actions > Email.

From there, you can add Recipients, select an Email Template (optional), add a Subject and compose your message. Once finished, click Send Email.
Send an Email from Reports
You can also send an email directly from Reports. Once your Report is generated, select any number of Supporters you wish to email using the checkboxes or Select All, and then click Generate Email. Once you click Generate Email, a screen will open where you can compose your email message. You will see that the supporters selected from your Report are listed in the Other Recipients area.

REACH also has system-generated emails that go to supporters for specific activities and supporter engagement. See the article on REACH System Emails for a list and description of those system emails.
Tracking Emails
If you are on a REACH Pro or Pro Plus plan, you will be able to track your Emails once sent from REACH.
The main Emails page will list the Email Title, Belongs to (Recipient – listed as a group or defined Purpose based on the Send To field when composing), Send date, if Sent and the number of Opens.
Here’s an example in which we sent a Fall Update email to the Sponsors of Silas Owino. (This was done by choosing Send To: Sponsorship; Sponsorship: Silas Owino).

If you click on the Title of the Emails, you will see more detailed tracking information.
- The Top Section will again list the Sent At (date and time) and the Recipients (Belongs to) information. Click on the Recipients link to be taken to another page.
- The Body will show your Email message content.
- The Bottom Section will list the Opened from Email (Recipient’s email), Open Count (number of times the Email has been opened), Last Opened At (the date the email was last opened), Total Open Count (how many opened the email) and Percentage Opened (the percentage of how many opened from how many sent).
- You can click on the Export Mailing Opens button to generate and download a spreadsheet with this information, if needed.

This information is also recorded in your individual Supporter’s record.
To view, go to Supporters > search for your desired supporter record. Once there, click on the Activity tab.
As you’ll see, it’ll list the Mailing and the Purpose, both are clickable and will take you back to the original Email.

Click on the Actions button to add an internal Admin Note to this activity record, if desired.
Communicating with Supporters Webinar
View a recording of our Webinar #5 Communicating with Supporters for more detailed information.

Also See:


Let’s Get Social