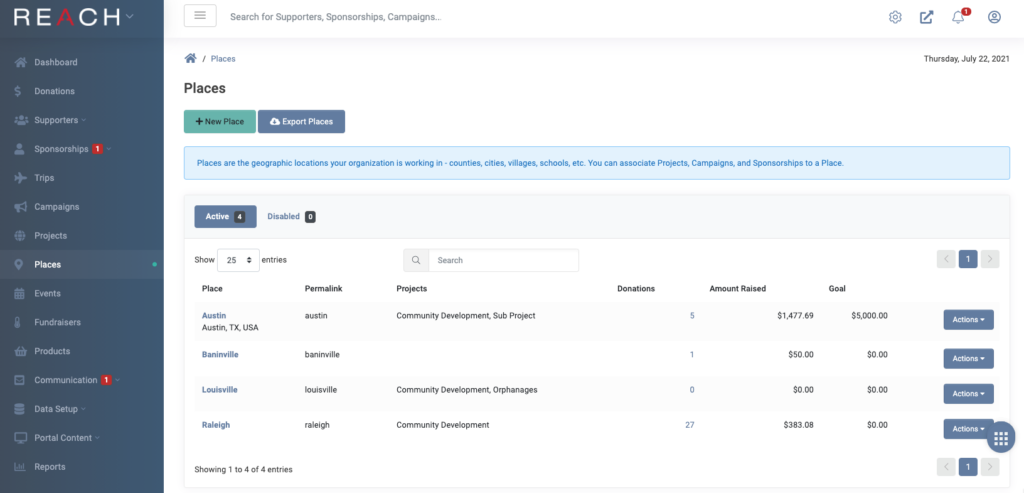
REACH allows organizations to add any number of Places to help tell the story of the locations in which you serve. Places can be associated to a Project, Campaign and Sponsorship(s) and updates can be posted to allow Supporters to stay informed.
Note: You can update the Hero Image (Cover Image) on your main Places page in the Settings > Portal Setup > Places tab.
The main Places page will list the Place, its Permalink, any associated Projects, the number of Donations, the Amount Raised and the Goal Amount.
The Actions button allows you to Edit, Copy, Crop Images, create a New Message or a New Email to the Place’s supporters, Generate a QR Code, or Disable the Place.
You can also tag your places (ex: assign them to an admin or give them an admin-only view priority status).

To create your Places:
- Go to Places > +New Place
- Fill out the information as needed
- Places can be disabled to not be shown on the public page
- The Image will show as the profile image on the main Places page, and as a small image on the specific location page
- The Cover Image is the banner image on the specific location page
- If you would like to fundraise for a place and set a Goal amount, that amount will be shown on the place page, and any dollars raised will be shown as well
- Contact information–Leader, Phone, Email–will be shown on the public page
- If you would like to add any custom fields to your Place page, you can do so in the Custom Fields module by selecting Place as the Referral
- Note: If your organization uses MailChimp and you have integrated your accounts, you can set a MailChimp tag to send emails from MailChimp directly to your Place donors. You will need to have this box enabled on the Site Integrations page in order to use this option
- Add Donation Levels (optional) to provide your supporters donation benchmarks as pre-determined donation amounts (ex: $50, $100, $250) as a one-time or recurring donation.
- If you attach a Place to a Project, the Place map will display on the Project page
- You can include the exact location by listing the latitude and longitude coordinates under Location. The marker will show on the map
- Add information about the place in the Description box. The first part of this text will also show under the profile image on the main Places page
- From the public site, supporters can choose a sponsorship based on place (location) – those locations are the Places you have set up
- You can assign a sponsorship to a location from the Sponsorship record: click Edit and then select the appropriate location from the Place drop down menu
- Sponsorships can then be filtered on the sponsorship page, and will also show in a tab on the Place page
- If you would like to associate a Campaign to a place, this can be done when setting up a Campaign by clicking the Attach to Place button. That campaign will then be shown in a tab on the Place page
- When finished, click Create Place


Let’s Get Social