This article walks you through how to place Product orders, adjust your account settings for admins that handle product orders and how to view Product Orders.
Admin Notifications and Automations
As noted in our Products Overview article, REACH provides several ways for Admins to manage products and their orders through permissions, notifications and automations.
1 – Admins must have access to manage products and their orders. This can be done by going to Settings > Admin Users and editing the Admin. Under the Permissions tab, check the box for Products > Give Access and click Save Changes. Note that Admin Permissions are available for REACH Essentials, Pro and Pro Plus plans.
2 – Admins can additionally be notified when there is a new product order and/or an order that requires shipping. This can be done by going to Settings > Admin Users and editing the Admin. Under the Notifications tab, check the boxes for New Product Order and Ship Order as desired and click Save Changes.
Note: If you don’t want to give an admin full permission to Products, but want them to receive notifications of product orders that require shipping, only select Ship Order under Notifications in their Admin User Settings.
3 – Admins can also set up an Admin Automation to be notified, via email or by having a task assigned to tehm, when a supporter places a new Product Order. Refer to our Admin Automations article for further instructions.
Admins with their Permissions set for access to Products will be notified of new product orders, including the order information and shipping address in the email.
Permissions are available for Essentials, Pro and Pro Plus Plans.
Note: If you don’t want to give an admin full permission to Products, but want them to receive notifications of product orders that require shipping, select Ship Order under Notifications in their Admin User Settings.
Ordering Products (Public-Side)
Note: Some of the features shown require that you update your REACH Theme to Quartz 2.3 or Ruby 2.3 or higher. Refer to our Updating your REACH Theme article to learn more.

When a supporter selects a product by clicking Add to Cart, the Cart will include:
- Item(s) with the ability to update the quantity or remove the item
- Price
- Ability to Purchase Another Product
- Note: This will navigate the supporter back to the Products list
- Ability to Apply any Discount Codes
- Refer to our Product Discount Codes article to learn about creating Discount Codes
The Pricing section will include:
- Subtotal
- Shipping amount, if Shipping is Required
- Refer to our Shipping Methods article to learn about your shipping options
- Any applied Discount
- Total
Note: In REACH theme 2.3 or higher, there is now a Cart icon, with a number, displayed in the navigation bar when a supporter adds a product. If a supporter navigates away from the Cart page, they can click the icon to return to the cart from anywhere in your REACH portal.

Once reviewed, the supporter will click Checkout to complete their purchase.
For recurring Products, ex: a Coffee Subscription, the recurring period options will be shown on the Checkout page.
- Note: Recurring Products must be added and purchased separately from single purchase products. For example, you cannot order a REACH Mug and a recurring monthly coffee subscription in the same purchase. To prevent this, REACH will automatically remove non-recurring products from the Cart when a recurring product is added and vice versa.

As noted in the Adding Products article, we recommend noting the recurring options in the Product description (ex: This is a monthly subscription).
Ordering Products (Admin-Side)
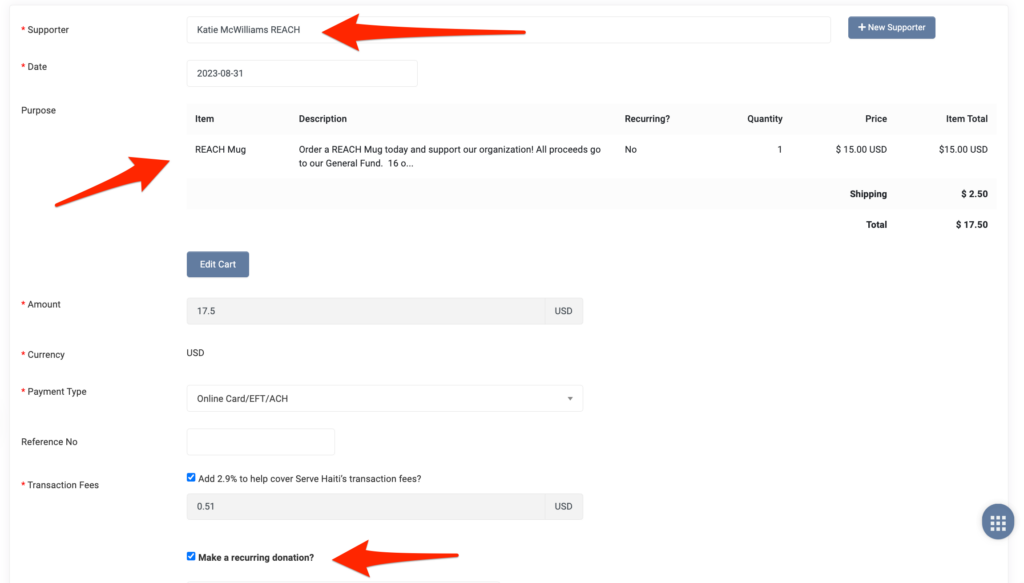
Admins can also process product orders on behalf of their supporters.
To do so:
- Go to the Products module to view all products
- Next to the product desired, click Actions > Add to Cart
- In the pop up window, select the desired Quantity and click Add to Cart

- Once all products are selected for purchase, click the Cart button on the page
- Note: Recurring Products must be added and purchased separately from single purchase products. For example, you cannot order a REACH Mug and a recurring monthly coffee subscription in the same purchase. To prevent this, REACH will automatically remove non-recurring products from the Cart when a recurring product is added.
- Confirm the orders shown, apply any Discount Codes if desired, and click Checkout

- Add the Supporter and follow the prompts to complete the purchase

Managing Product Orders
In the Admin Console, Product Orders will be shown in the Orders section (Products > Orders) and will include:
- Order Number
- Date
- Supporter name
- Product Item(s)
- Shipping Required? (Yes/No)
- Status (Cancelled, Fulfilled, Unfulfilled, Ongoing)
- Payment Status

Click on the Actions button to Mark as Fulfilled, View Payment, Archive.

Use the All, Recurring, Unfulfilled, Fulfilled, Cancelled and Archived tabs to view products as designated in those categories.
A more detailed Product Orders report can be generated by clicking on the Product Orders Report button or go to Reports > Product Orders. Refer to our Product Reports article for more specifics.


Let’s Get Social